
Posted on February 01 2022

PEARL FINISHES - Wet Technique
Pearlised finishes are a simple and effective way to turn a plain iced design into a glamorous one. They make lacework “pop” and reflect soft light beautifully.
Use them for a soft and pretty look or even a bit of fun on a bold and bright cake.
This tutorial covers the “wet” technique – ie, using cake decorators' alcohol.
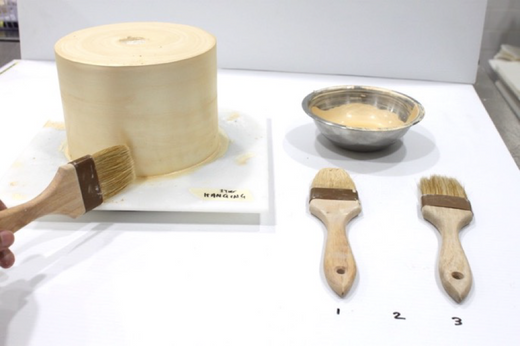
Use a lustre the shade you need or mix together different colours for a custom tint. Put lustre in a bowl and add the cake decorator’s alcohol. For the custom tint in this tutorial we have added pearl white, regency gold and a bit of nude taupe to create a rich champagne colour. If colour matching, you can also tint the mix with petal dust or liquid / airbrush colours but not gels or pastes as they don’t dissolve.
Mix with your “wet brush” to a nice consistency. The mixture shouldn’t be too thin (like water) or to thick (like wet cement). It should coat the side of the bowl. If too thin the lustre will look streaky and if too thick it will evaporate quickly and be lumpy. The mix is usually one tablespoon of lustre to one quarter-cup of alcohol. 
The first coat should be applied with the wet brush in long smooth strokes. The top should be first and then work your way down the tiers. Use the turntable in a spinning motion to achieve nice long horizontal lines around the cake.
Now switch to a dry brush and use the same method of holding the brush against the tier while turning the turntable with your other hand. This will act as a buffer to smooth out the brushstrokes as the alcohol drys. You will need to do two coats, even if you are applying white lustre on a white cake. The finish will be more uniform and opaque. You don’t need to wait to apply the second coat, the alcohol evaporates very quickly and and is dry after buffing the first coat. Repeat the entire process again using the wet brush to apply a second coat, then the dry brush to polish.
For darker colours like the rose gold above, three coats may be required. Any more than three coats can result in a very thick and uneven-lumpy texture. We don’t recommend more than the three coats. You can always wash off and start again if you don’t like your finish! If needed, use a clean dry brush to remove any last bits of extra dust. This is helpful so dust doesn’t fall off the tier when you decorate and move the cake around.
I have tried to make this tutorial as comprehensive as possible.
Faye.
PRODUCTS USED:
Faye Cahill - Edible Lustre 10ml
0 comments